Courtesy player Losermaker on Stratego.com's forums
Background[]
I remember TheProf (then Xerxes) writing something about this at the metaforge forum. It is a very, very simple technique which most (if not all) platinum players know how to do and is easy to learn if you do not yet know how to do it.
TheProf wrote, “Dividing the board is a manoeuvring technique in which you keep your opponent’s highest piece on one side of the board using an equal or higher piece of your own. This assumes your opponent is unwilling to trade this piece”.
He then continued to write about how to do it and gave some pictures, which unfortunately I no longer have (I snipped the definition because I really liked it ).
Whilst he sums it up very nicely, I would like to go into some more detail.
How to do it:[]
This technique is able to be done by any piece- “assuming your opponent is unwilling to trade the piece”.
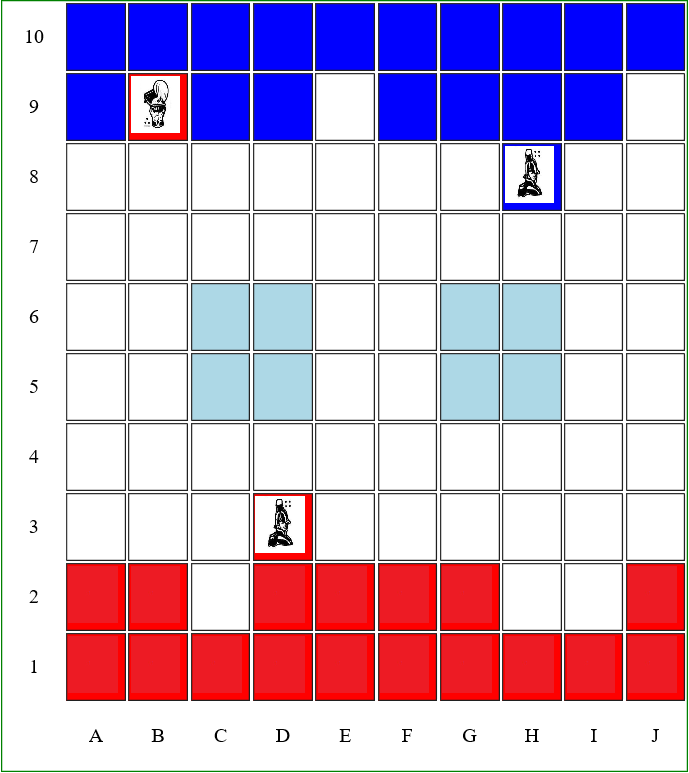
Example 1:[]
You have just captured a major of your opponent using your colonel.
You are confident you can win the game on that lead alone. Marshals are gone, all other pieces are even.
Being unsure what to do, blue moves his general across to the right side of the board, you can then bring your general and divide the board as shown, completely paralysing his general unless he is willing to lotto J2 or I1. Once in the position shown, you get 1 free move every 3 moves.

Example 2 (with bombs):[]
Assume blue’s spy is gone.

In this example it is a similar situation but if blue’s general moves to I3 it is a definite trapping this time.
Now that you know how to do it, I will go into some more minor, but sometimes very crucial details.
It is obviously better (and sometimes necessary) to divide the board on the side where there are less pieces to avoid damage by lotto, but sometimes it is better to lure the piece to the side you want for better defense.
Example 3[]
Assume Blue’s spy is gone and you are winning (bombs are unknown).


As you can see here, by moving your lieutenant you are able to divide the board, possibly risking loss of a piece at H1 or I1 but it will ultimately result in a trapped general.
Now this is O.K. but your flag is quite susceptible to an attack from the right if you do this, suppose that his general stays at H7, you may be forced to use your marshal to defend from another piece coming (i.e. J8)
In this situation I would temporarily divide the board (as shown below) to buy me time to rearrange my board.


Of course every game is different but now if blue wishes to bring his general to the left side, (assuming that C2 and A2 are not higher than a lieutenant at most) you can repeat the dividing manoeuvre there and have a much better defense for your flag.
The last thing I want to show is a situation of when to break from dividing the board, either because it is not progressing the game, or because you can gain an advantage from doing so.
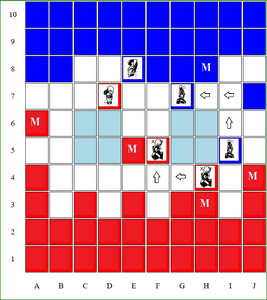
Example 4:[]
In this scenario it is Blue’s turn to move. Both players have 1 colonel left and the game is even, with the exception that Blue traded his marshal for Reds general. The moved piece at H8 is suspected spy as general came from I8. Since you swapped a colonel on the left side next to Blue’s marshal you suspect that the other colonel is either in the centre somewhere, or (most likely) over near the spy and general.


Your marshal is holding back his general, but if you are able to buy some time you can rearrange your base and make an attack on his major. It is Blue’s turn to move. Blue’s general is coming back to try to get his major free.


The 4 most common moves here would be:
- Blue moves general to F7
- Blue moves general back to H7
- Blue moves F8 to F7
- Blue moves another random piece.
In the case of #1, your Marshal MUST go to F6 (if it does not there is a possibility of a good player (who makes all the right moves) being able to free the major:
If #2 occurs you are free to make a move to rearrange your base before having to bring marshal back down to H4 (dividing the board)
- 3 requires either a scout put at F4 or F3 to be safe (does not ensure major capture) or willingness to take the risk of F8 not being spy and moving marsh up to F6 (also lets general into your base on the right).
- 4 allows you to make another free move to rearrange.
Let’s go back to #1 and look at what happens if he moves his general to F7 (Red moves to F6 with Marshal) then E7.


If Blue moves general to E7 the major is lost (provided his colonel is not in the centre somewhere).
Lastly, if Blue is willing to let you divide the board then you are getting free moves, allowing to rearrange your board to something more like this:

Your most valuable of the moved pieces you have moved to E5 so that the marshal can defend it after you have trapped Blue’s major. A6 is the next safest place to put a captain or major as Blue’s colonel is highly unlikely on that side. Your moved piece at J4 should be no higher than a sergeant, and the piece at H3 you should be able to defend from general and colonel after capturing the major, however it is best that this piece is no higher than a lieutenant in case things go wrong . You are now ready to make your attack the next time you are dividing the board and move your marsh to F6 ready to attack.
If you have any suggestions, comments or questions please feel free to ask them in my other thread found here: http://forum.strateg...-and-questions/
Alternatively, you can send me a PM but if it is a general question I think it is better that it is a public post so that all may learn/benefit from it.
Have a good week,
Losermaker
Special thanks to Morx for his Setup Editor and Tilor for Editing.